4.12 Component Default Settings
This section explains the configuration of component ports and the configuration of flowlink filters.
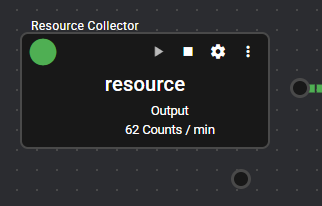
4.12.1 OUT Port#
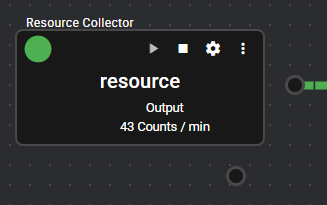
The OUT Port is the source port to which the flowlink is connected and to which the component outputs data. In the OUT Port, you can configure settings such as storage, registration conditions, and whether or not conversion is performed for the output data.
4.12.1.1 Storage Configuration#
Data with persistence enabled will be saved in storage, and while it is saved, you will be able to reference it from SQL and through Grafana integration. By following the steps below, you can configure storage settings for the output data of the component.
-
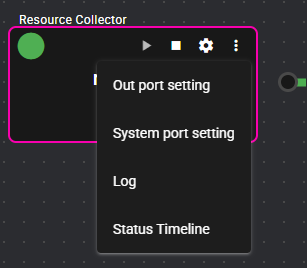
Open the OUT Port dialog using one of the following methods.
- Left-click the menu icon and select "OUT port setting".
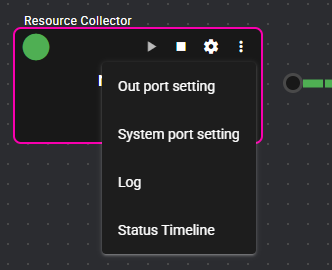
- Right-click on the OUT Port.
-
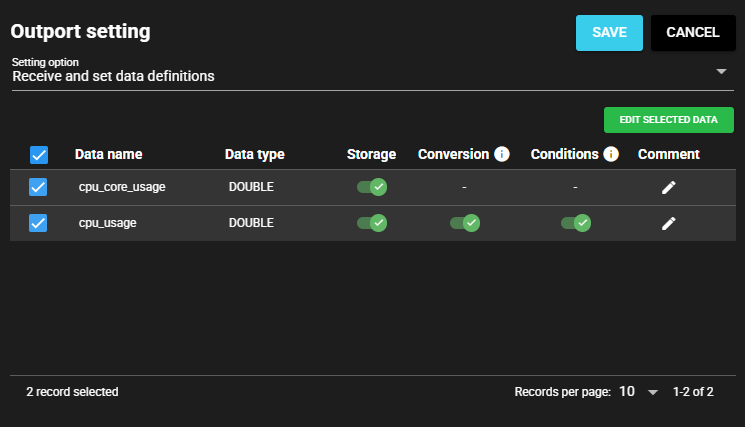
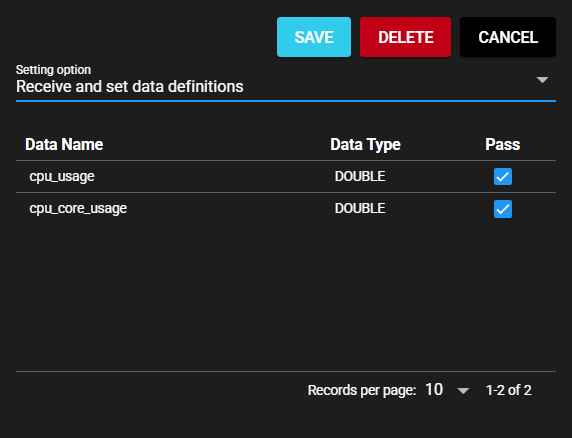
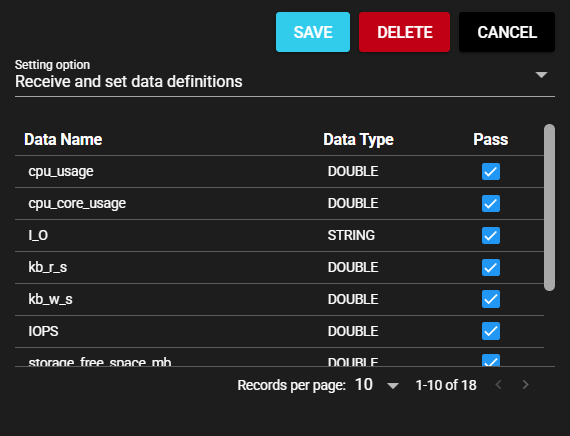
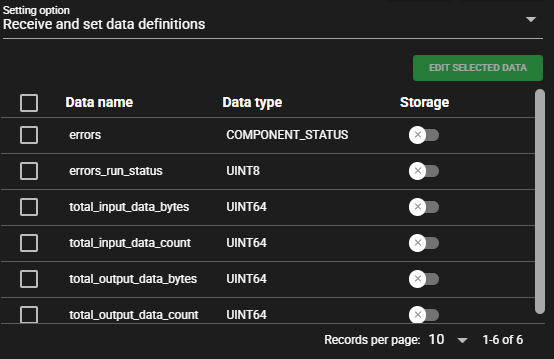
Select a Setting Option from the following.
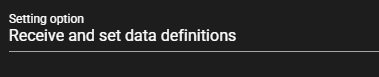
Item Description Set after receiving data definitions Output data is listed and storage configuration is performed individually. Set by regular expression A regular expression is input, and storage configuration is performed on any matches in the output data. -
Only when the Setting Option is Set by Regular Expression, input the following items for the data to be configured.

Item Description Data Name Regular expression indicating the data name of the output data to be configured Data Type Data type of the output data to be configured Regular Expression Input Examples
The following are input examples of regular expressions.
- Match only "data1": data1
- Match data whose name includes "abc": .*abc.*
- Match data whose name starts with "abc": abc.*
- Match data whose name ends with "abc": .*abc
-
Do one of the following to open the Storage Configuration dialog.
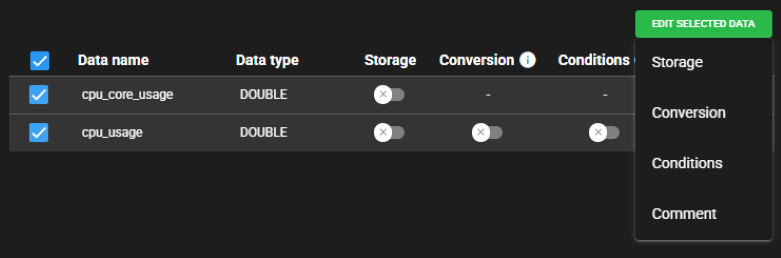
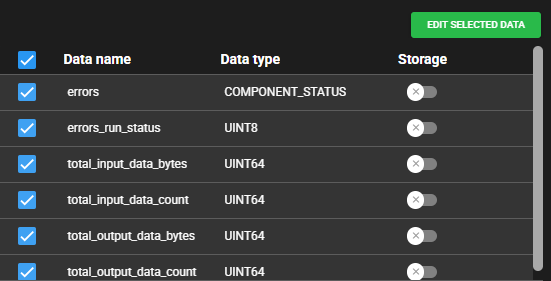
- Press the Storage icon for the data for which you want to configure storage.
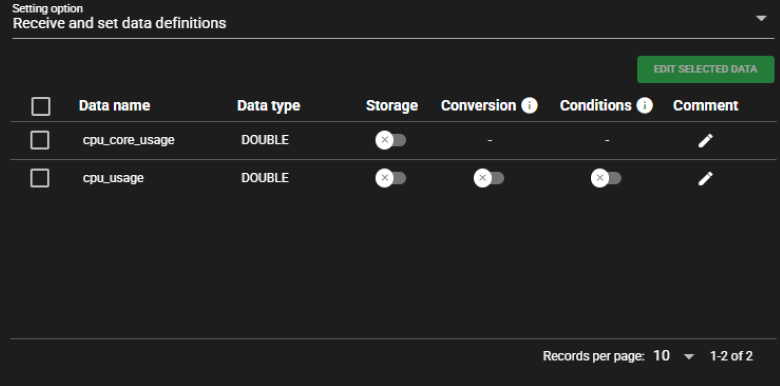
- Place a check mark on the data for which you want to configure storage, press Edit Selected Data and select Storage. The same configuration will be applied to the data with a check mark.
-
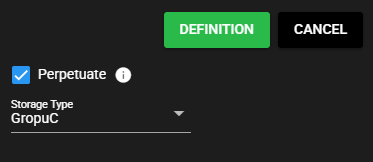
Set Perpetuate to ON.

-
Input the following items.
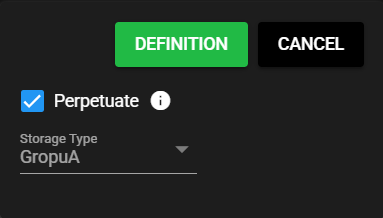
Item Description Storage Type Storage period in the time series database.
You can check and change the storage period for GroupA, GroupB, and GroupC in Specify the Storage Keep Time by Group in the Server Settings. You can only make changes when Specify the Storage Keep Time by Group is ON.
Default Value
• GroupA : 30 minutes
• GroupB : 24 hours
• GroupC : 7 days -
Press Definition.
-
Press "Save".
-
The storage configuration will be applied.
4.12.1.2 Conversion Configuration#
Conversion is a function for registering data obtained from the results of calculations, rather than registering the original data as is. By following the steps below, you can configure conversion settings for the output data of the component.
-
Open the OUT Port dialog using one of the following methods.
- Left-click the menu icon and select "OUT port setting".
- Right-click on the OUT Port.
-
Select a Setting Option from the following.
Item Description Set after receiving data definitions Output data is listed and conversion configuration is performed individually. Set by regular expression A regular expression is input, and conversion configuration is performed on any matches in the output data. Array type output data is not applicable
Array type output data is not applicable for conversion.
Even if the data name is applicable in the regular expression condition, if the data is an array type, the conversion will not be processed.
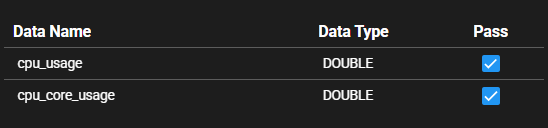
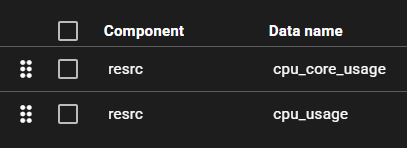
An example of this is the Resource Collector "cpu_core_usage". -
Only when the Setting Option is Set by Regular Expression, input the following items for the data to be configured.
Item Description Data Name Regular expression indicating the data name of the output data to be configured Data Type Data type of the output data to be configured Regular Expression Input Examples
The following are input examples of regular expressions.
- Match only "data1": data1
- Match data whose name includes "abc": .*abc.*
- Match data whose name starts with "abc": abc.*
- Match data whose name ends with "abc": .*abc
-
Do one of the following to open the Conversion Configuration dialog.
- Press the Conversion icon for the data for which you want to configure the conversion settings.
- Place a check mark on the data for which you want to configure the conversion settings, press Edit Selected Data and select Conversion. The same configuration will be applied to the data with a check mark.
-
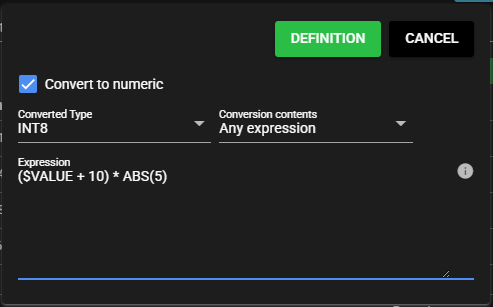
Set Convert to numeric to ON.

-
Input the following items.
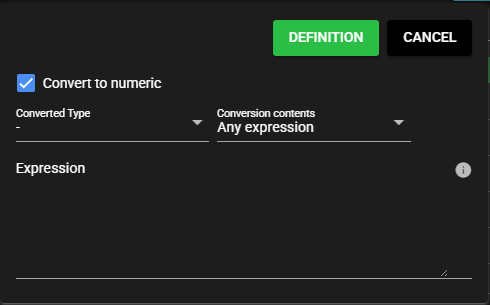
Item Description Converted Type Converted data type Conversion Type Select the type of numerical conversion formula to be applied
The following conversion types are available:
・Custom formula
・BCD (4 digits) → INT
・BCD (8 digits) → INT
・BCD (16 digits) → INT
Note: Selecting Custom formula allows you to enter a user-defined numerical conversion formula.
Note: Selecting BCD (4 digits) → INT, BCD (8 digits) → INT, or BCD (16 digits) → INT will automatically insert a predefined formula for converting a BCD value to an integer. You cannot edit the formula in these modes. To edit the formula manually, select Custom formula.
Note: Data converted from BCD to an integer will be treated as an integer type. If you write the converted value to an address that expects BCD—such as for PLC writes or EtherNet/IP writes—the value will not be correct.Expression Expression to be executed in the conversion
Note: Click on the icon at the right end of the input area to display a list of input examples and elements that can be used in the expression. -
Press Definition.
-
Press Save.
-
The conversion configuration will be applied.
4.12.1.3 Set Registration Conditions#
Registration Conditions are a function for registering only the data that meets the conditions. Data that does not meet the conditions will be treated as not applicable and will not be registered. By following the steps below, you can configure the settings of the registration conditions for the output data of the component.
-
Open the OUT Port dialog using one of the following methods.
- Left-click the menu icon and select "OUT port setting".
- Right-click on the OUT Port.
-
Select a Setting Option from the following.
Item Description Set after receiving data definitions Output data is listed and the configuration of registration conditions is performed individually. Set by regular expression A regular expression is input, and the configuration of registration conditions is performed on any matches in the output data. Array type output data is not applicable
Array type output data is not applicable for registration conditions.
Even if the data name is applicable in the regular expression condition, if the data is an array type, the registration conditions will not be processed.
An example of this is the Resource Collector "cpu_core_usage". -
Only when the Setting Option is Set by Regular Expression, input the following items for the data to be configured.
Item Description Data Name Regular expression indicating the data name of the output data to be configured Data Type Data type of the output data to be configured Regular Expression Input Examples
The following are input examples of regular expressions.
- Match only "data1": data1
- Match data whose name includes "abc": .*abc.*
- Match data whose name starts with "abc": abc.*
- Match data whose name ends with "abc": .*abc
-
Do one of the following to open the Set Registration Conditions dialog.
- Press the Registration Conditions icon for the data for which you want to configure the settings of the registration conditions.
- Place a check mark on the data for which you want to configure the settings of the registration conditions, press Edit Selected Data and select Registration Conditions. The same configuration will be applied to the data with a check mark.
-
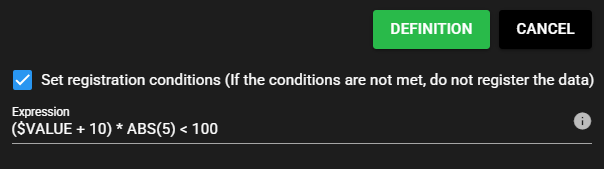
Select ON for Set Registration Conditions.

-
Input the following items.

Item Description Conditional expression Conditional expression for determining the data to be registered
Note: Click on the icon at the right end of the input area to display a list of input examples and elements that can be used in the expression. -
Press Definition.
-
Press Save.
-
The configuration of registration conditions will be applied.
4.12.2 Filter#
The filter function allows you to determine which data is allowed to pass over the flowlink.
4.12.2.1 Setting Option#
You can configure filter settings by following the steps below.
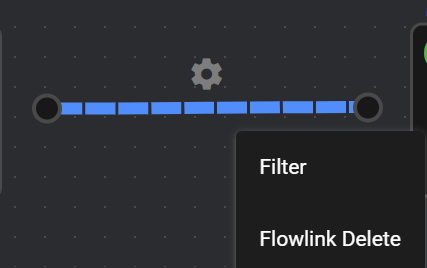
-
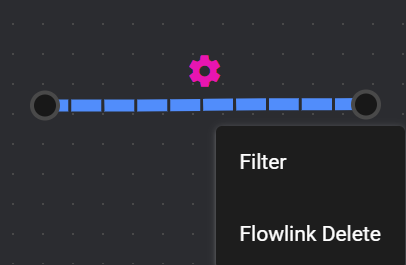
Right-click on the flowlink.

-
Select Filter.
-
Select a Setting Option from the following.
Item Description Set after receiving data definitions Data from the source to which the flowlink is connected is listed, and the configuration of filter settings is performed individually. Set by regular expression A regular expression is input, and the configuration of filter settings is performed on any matched data from the source to which the flowlink is connected. -
Only when the Setting Option is Set by Regular Expression, input the following items for the data to be configured.

Item Description Data Name Regular expression indicating the data name of the data to be configured from the source to which the flowlink is connected Data Type Data type of the data to be configured from the source to which the flowlink is connected Regular Expression Input Examples
The following are input examples of regular expressions.
- Match only "data1": data1
- Match data whose name includes "abc": .*abc.*
- Match data whose name starts with "abc": abc.*
- Match data whose name ends with "abc": .*abc
-
Set Pass Through to ON for the data you want to pass through to the destination to which the flowlink is connected.
-
Press Save.
-
The configuration of filter settings will be applied. The icon of the flow link with the applied settings will change color.

4.12.2.2 Delete#
You can delete a filter by following the steps below.
-
Right-click on the filtered flowlink.

-
Select Filter.
-
Press Delete and select Yes in the confirmation dialog.
-
The configuration of filter settings will be deleted. The icon color changes.

4.12.3 Flowlink Icon#
When the icon that appears upon connecting a flow link is left-clicked, the same operations as right-clicking the flow link can be performed. For more information about filter settings, see "Filters". For more information about deleting flow links, see "Delete".
![]()
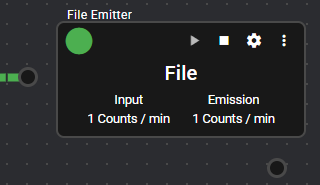
4.12.4 IN Port#
The IN Port is the port to which the flowlink is connected and the component receives data. In the IN Port, you can configure settings such as the use of events and whether or not to aggregate the received data.
4.12.4.1 Set Delay Time#
By following the steps below, you can configure delay time settings for the data received by the component.
-
Open the IN Port dialog using one of the following methods.
- Left-click the menu icon and select "In port setting".
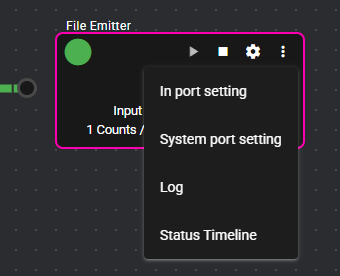
- Right-click on the IN Port.
-
Input the data collection delay time in milliseconds in the Delay Time(ms) field.
For more information, see Delay Time for Data Reference in Operational Specifications Related to Data Collection.
-
Press Save.
-
The configuration of delay time settings will be applied.
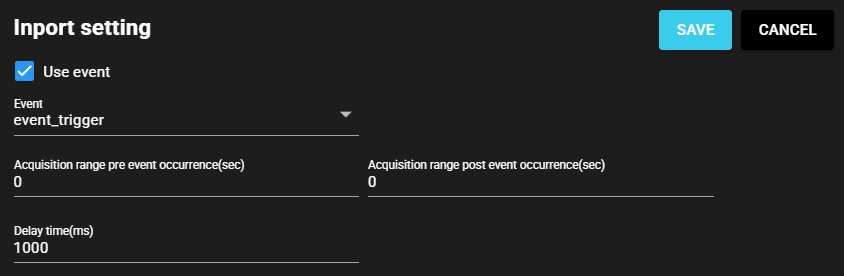
4.12.4.2 Configure Events#
By following the steps below, you can configure event settings for the data received by the component.
-
Register an event trigger. For more information, see Event Trigger.
-
Connect a flowlink from the event trigger to the component. For more information, see Add a Flowlink.
-
Open the IN Port dialog using one of the following methods.
- Left-click the menu icon and select "In port setting".
- Right-click on the IN Port.
-
Set Use Event to ON.

-
Select the registered event trigger in the Event field.

-
Input the following items.

Item Description Acquisition range pre event occurrence(sec) Range of acquisition of data before the event occurred Acquisition range post event occurrence(sec) Range of acquisition of data after the event occurrence -
Press Save.
-
The configuration of event settings will be applied.
4.12.4.3 Aggregation Configuration#
You can configure aggregation settings by following the steps below.
-
Open the IN Port dialog using one of the following methods.
- Left-click the menu icon and select "In port setting".
- Right-click on the IN Port.
-
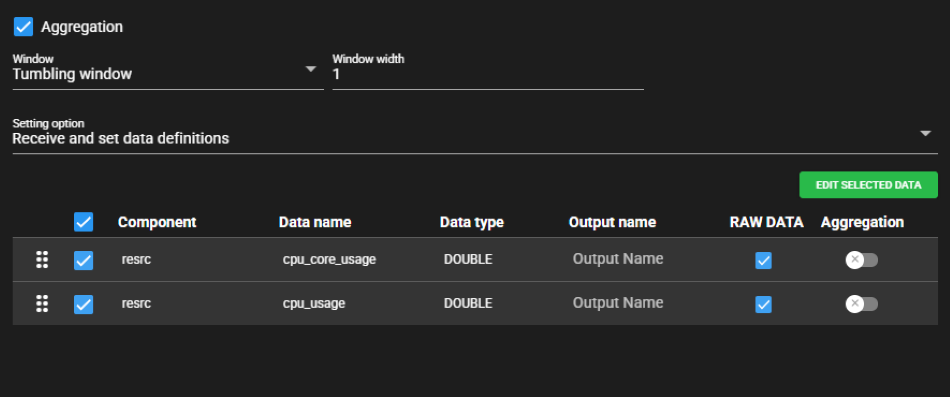
Set Aggregation to ON.

-
Select a Window from the following.

Item Description Tumbling window The range of data to be aggregated is delimited by the specified time span. -
Specify the window width. The input items will vary depending on the window you have selected.

Item Description (Tumbling window selected) Window width Input time span to be aggregated (in seconds) -
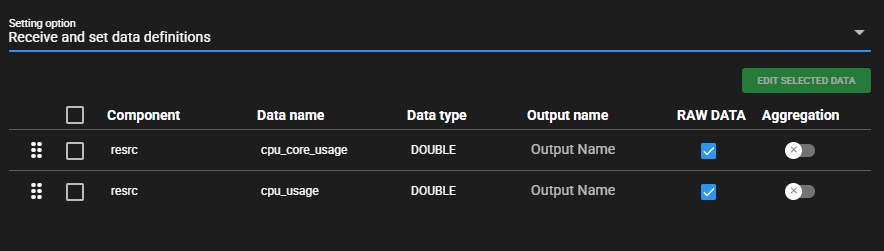
Select a Setting Option from the following.
Item Description Set after receiving data definitions Data received at the IN Port is listed and the configuration of aggregation settings is performed individually. Set by regular expression A regular expression is input, and the configuration of aggregation settings is performed on any matched data received at the IN Port. -
Input the following items for the data to be configured.

Item Description Component name Regular expression indicating the component name of the data to be configured that is received at the IN Port
Note: You can input this item only when the Setting Option is Set by Regular Expression.Data Name Regular expression indicating the data name of the data to be configured that is received at the IN Port
Note: You can input this item only when the Setting Option is Set by Regular Expression.Data Type Data type of the data to be configured that is received at the IN Port
Note: You can select this item only when the Setting Option is Set by Regular Expression.Output Name New name to overwrite existing data name
Note: You can select this item only when the Setting Option is Set After Receiving Data Definitions.RAW DATA You get unprocessed data. Regular Expression Input Examples
The following are input examples of regular expressions.
- Match only "data1": data1
- Match data whose name includes "abc": .*abc.*
- Match data whose name starts with "abc": abc.*
- Match data whose name ends with "abc": .*abc
-
Do one of the following to open the Aggregation Configuration dialog.
- Press the Aggregation icon for the data for which you want to configure the aggregation settings.
- Place a check mark on the data for which you want to configure the aggregation settings and press Edit Selected Data. The same configuration will be applied to the data with a check mark.
-
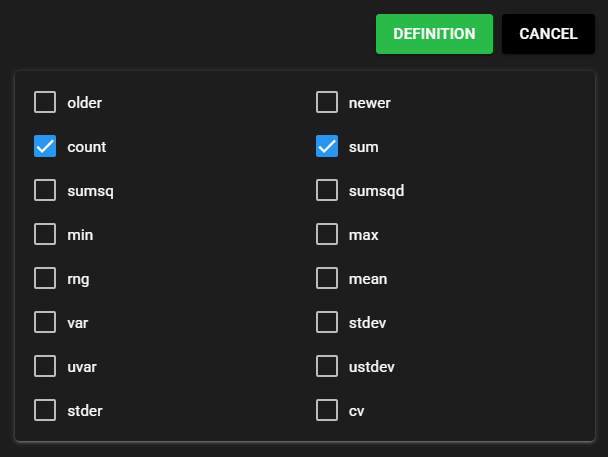
Place a check mark in the aggregation value you want to retrieve.
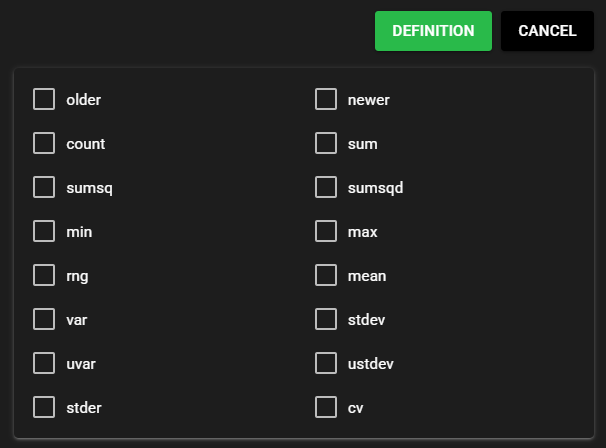
Item Description Older Oldest value in the target data Latest value Most recent value in the target data Count Number of counts of target data Sum Total value of the target data Sumsq Sum of squares of each target data Sumsqd Sum of the squares of the deviations of each target data from the mean Min Smallest value in the target data Max Largest value in the target data rng Difference between the maximum and minimum values of the target data Mean Average of the target data Var Square of the average of the deviation of each target data from the mean Stdev Square roots of variance Uvar Variance value divided by the number of counts minus one Ustdev Standard deviation of the sample Stder Standard deviation of the sample mean CV Standard deviation divided by the mean -
Press Definition.
-
Press "Save".
-
The configuration of aggregation settings will be applied.
4.12.4.4 Sorting Data#
You can change the sort order of the data by clicking on the icon at the left end of the data and moving it.
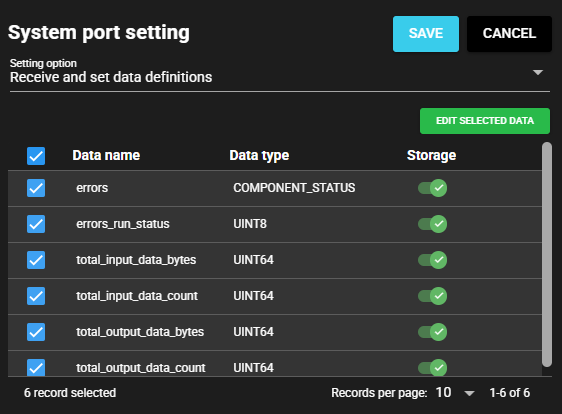
4.12.5 SYSTEM Port#
The SYSTEM Port is the source port to which the flowlink is connected and outputs system information (error information, operating information) of the component. In the SYSTEM Port, you can configure settings such as whether or not storage is performed for system information.
Changing the configuration of the SYSTEM Port
Do not change the settings that can be configured for this SYSTEM Port unless necessary, because they affect settings such as the error logging duration.
A component with unmodifiable settings
The Core Internal component is a special component for which System Port settings cannot be modified, ensuring persistence remains enabled.
4.12.5.1 Configurable System Information#
The following is the system information for the component output by the SYSTEM Port.
| Item | Data Type | Description |
|---|---|---|
| errors | COMPONENT_STATUS | Error information |
| errors_run_status | UINT8 | Operating status by integer value 0: Stop 1: Running (no errors) 2: Running (error occurred) 3: Error stop |
| total_input_data_count | UINT64 | Number of counts of input data |
| total_input_data_bytes | UINT64 | Number of bytes of input data |
| total_output_data_count | UINT64 | Number of counts of output data |
| total_output_data_bytes | UINT64 | Number of bytes of output data |
| total_received_count | UINT64 | Number of counts of data received by the component |
| total_received_bytes | UINT64 | Number of bytes of data received by the component |
| total_emission_count | UINT64 | Number of counts of data emitted by the component |
| total_emission_bytes | UINT64 | Number of bytes of data emitted by the component |
4.12.5.2 Storage Configuration#
Data with persistence enabled will be saved in storage, and while it is saved, you will be able to reference it from SQL and through Grafana integration. You can configure storage settings by following the steps below.
-
Open the SYSTEM Port dialog using one of the following methods.
- Left-click the menu icon and select "System port setting".
- Right-click on the SYSTEM Port.
-
Select a Setting Option from the following.
Item Description Set after receiving data definitions System information is listed and storage configuration is performed individually. Set by regular expression A regular expression is input, and storage configuration is performed on any matched data in the system information. -
Only when the Setting Option is Set by Regular Expression, input the following items for the data to be configured.

Item Description Data Name Regular expression indicating the data name of the data to be configured in the system information Data Type Data type of the data to be configured in the system information Regular Expression Input Examples
The following are input examples of regular expressions.
- Match only "data1": data1
- Match data whose name includes "abc": .*abc.*
- Match data whose name starts with "abc": abc.*
- Match data whose name ends with "abc": .*abc
-
Do one of the following to open the Storage Configuration dialog.
- Press the Storage icon for the data for which you want to configure storage.
- Place a check mark on the data for which you want to configure storage and press Edit Selected Data. The same configuration will be applied to the data with a check mark.
-
Set Perpetuate to ON.
-
Input the following items.
Item Description Storage Type Storage period in the time series database.
You can check and change the storage period for GroupA, GroupB, and GroupC in Specify the Storage Keep Time by Group in the Server Settings. You can only make changes when Specify the Storage Keep Time by Group is ON. -
Press Definition.
-
Press "Save".
-
The storage configuration will be applied.