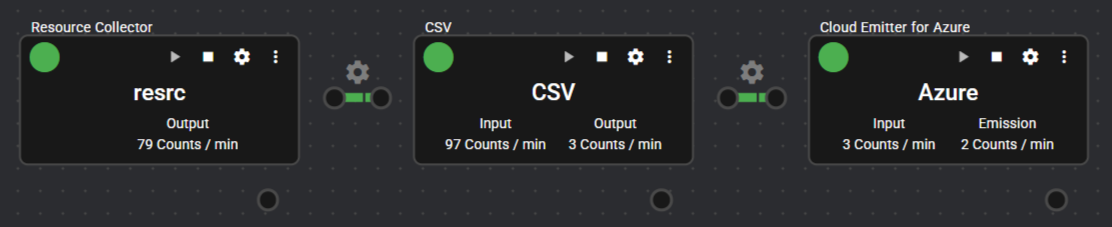
4.6 Emitter
This section describes emitter components.
4.6.1 MQTT Emitter#
This component emits any given data files (publish) using the MQTT protocol.
It receives data from various serializers connected to the IN port and emits it.
4.6.1.1 Basic Information#
The basic information of the MQTT Emitter is as follows.
| Item | Description |
|---|---|
| Base name | MQTT Emitter |
| Description | This emits data using the MQTT protocol (publish). |
| Consumption point | 2 |
| Port | Input: 1 This receives data in file format from the serializer component. The received data is emitted using the MQTT protocol (publish). Output: 0 System: 1 This outputs component operation status and error information. For details about the error information to be output, refer to Error Code List. |
| Other | Test connection to the MQTT broker can be performed. For detail, see Test Connection. |
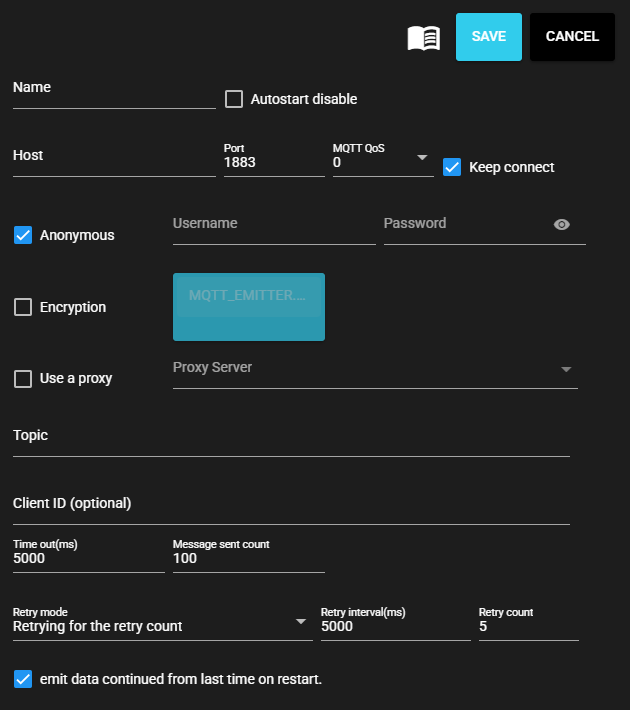
4.6.1.2 Configuration item#
The configuration items for the MQTT Emitter is as follows.
| Item | Description |
|---|---|
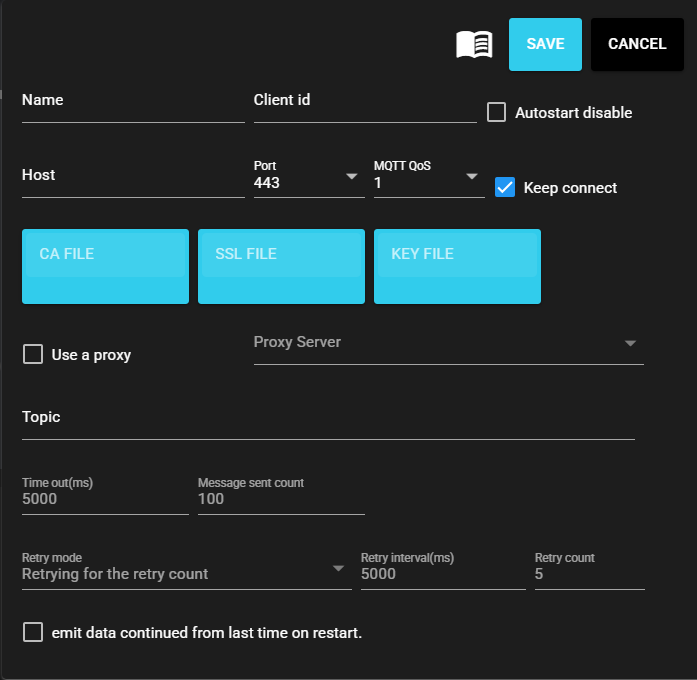
| Name | Name to be assigned to the component Note: The same name as another component name cannot be used. |
| Autostart disable | Select ON to disable the Autostart of the component. |
| Host | Specify the host name or IP address of the MQTT broker. |
| Port | Specify MQTT broker port number. |
| MQTT Qos | Select the MQTT QoS level to use (0: No reception confirmation, 1: Reception confirmed, 2: Reception confirmed with duplicate suppression) |
| Keep connect | Do not disconnect server connection after each emission. |
| Anonymous | Select ON to access the broker anonymously. |
| Username | Input a username if you are not accessing the broker anonymously. |
| Password | Input a password if you are not accessing the broker anonymously. |
| Encryption | Select ON to perform encryption. |
| CA certificate | Upload a CA certificate. Note: Uploadable only when encryption is ON. |
| Use a proxy | Set to ON to communicate with the MQTT broker via a proxy server. |
| Proxy server | Select a proxy server. Note: You must configure the server to be used in advance on the Proxy Settings screen. |
| Topic | Topics to be assigned when publishing |
| Client ID | MQTT Client ID Note: This may need to be specified depending on the connection destination's specifications. If omitted, a random string will be used. Note: When connecting multiple components to the same MQTT broker, ensure each client ID is unique and not duplicated. Otherwise, communication will not function correctly. |
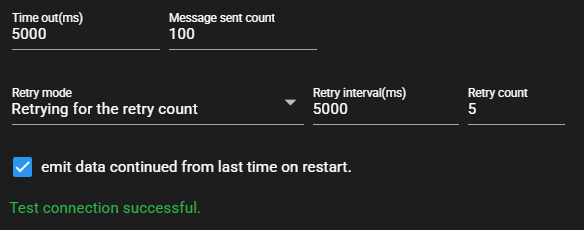
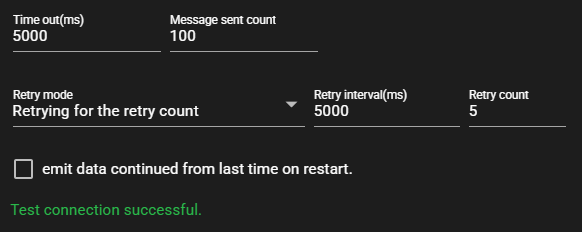
| Time out (ms) | Input the timeout duration for the emission process in milliseconds. |
| Message sent count | Maximum number of emissions in a single event |
| Retry mode | Select the behavior when retrying after an emission failure. |
| Retry interval (ms) | Input the emission retry interval. |
| Retry count | Input the emission retry count. Note: This can be input only when the retry mode is "Retrying for the retry count". |
| After the start, data is output continuing from where the previous emission left off. | When the component is stopped and restarted, data is output continuing from where the previous emission left off. |
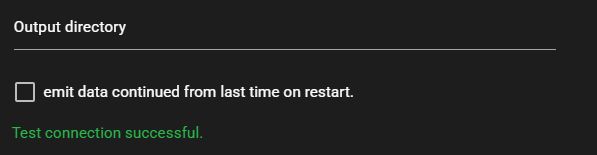
4.6.1.3 Test connection#
A test connection to the configured destination can be performed by following the steps below.
-
Open the configuration screen for the registered MQTT Emitter.
-
Press Test.

-
A test connection is performed to the configured destination, and the result is displayed at the bottom of the configuration screen.
Cautions for MQTT Emitter Test Connection
The test connection can only be performed under the following conditions.
・ When the component is stopped
・ When the component status is in error
Note: For details about the status, refer to Status List.
4.6.2 File Emitter#
This component saves the collected data as a file in storage.
Data received from the serializers connected to the IN port is saved to a file path specified by the parameter.
The saved files can be downloaded by specifying a time range in the configuration dialog.

4.6.2.1 Basic Information#
The basic information of the File Emitter is as follows.
| Item | Description |
|---|---|
| Base name | File Emitter |
| Description | This saves the collected data in the storage. |
| Consumption point | 0 |
| Port | Input: 1 This receives data in file format from the serializer component. The received data is saved in the storage. Output: 0 System: 1 This outputs component operation status and error information. For details about the error information to be output, refer to Error Code List. |
| Other | The output file can be downloaded. For details, see Download file. |
4.6.2.2 Configuration item#
The configuration items for the File Emitter is as follows.
| Item | Description |
|---|---|
| Name | Name to be assigned to the component Note: The same name as another component name cannot be used. |
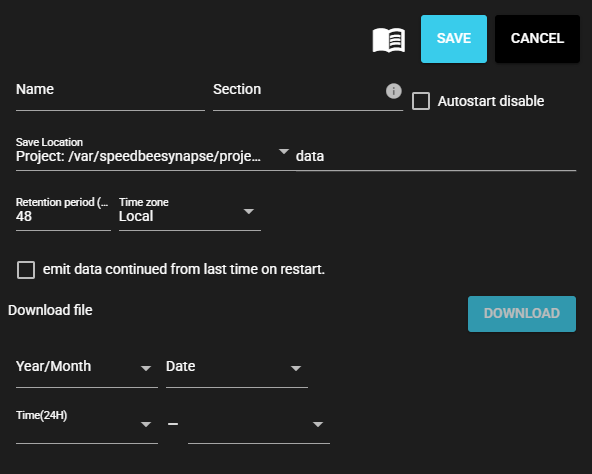
| Section | Input any value that is uniquely assigned to each File Emitter. Note: The section is used as the subdirectory name of the output directory. Only one-byte characters can be entered. |
| Autostart disable | Select ON to disable the Autostart of the component. |
| Output directory | This is the directory where files are output. Specify a base directory and its relative path. The base directory can be selected from the options below.
|
| Retention period (hour) | Input the duration for which the file will be kept in storage. |
| Time zone | Select a time zone for a file. |
| After the start, data is output continuing from where the previous emission left off. | emit data continued from last time on restart. |
4.6.2.3 Download File#
The file output by the File Emitter can be downloaded by performing the following steps.
- Input the time range in the "Download file" section.
- Press Download to download the files output within the time range input in the step above, in ZIP format.
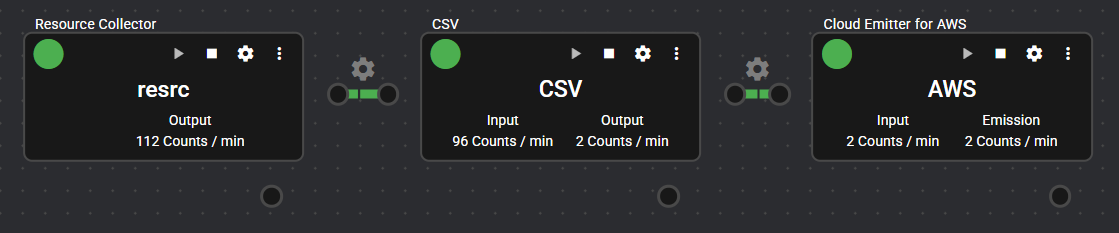
4.6.3 Cloud Emitter for AWS#
This is a component that emits data to AWS IoT Core.
It receives data from various serializers at the IN Port and emits the data to AWS IoT Core.
4.6.3.1 Basic Information#
The basic information for the Cloud Emitter for AWS is as follows.
| Item | Description |
|---|---|
| Base name | Cloud Emitter for AWS |
| Description | This emits data to AWS IoT Core. |
| Consumption point | 2 |
| Port | Input: 1 This receives data in file format from the serializer component. The received data is emitted to AWS IoT Core. Output: 0 System: 1 This outputs component operation status and error information. For details about the error information to be output, refer to Error Code List. |
| Other | Test connection to AWS IoT Core can be performed. For detail, see Test Connection. |
4.6.3.2 Configuration item#
Configuration items for Cloud Emitter for AWS are as follows.
| Item | Description |
|---|---|
| Name | Name to be assigned to the component Note: The same name as another component name cannot be used. |
| Client ID | AWS IoT Core Client ID |
| Autostart disable | Select ON to disable the Autostart of the component. |
| Host | Input the host name for AWS IoT Core. |
| Port | Select the port number for AWS IoT Core (445 or 8883). |
| MQTT Qos | Select the QoS of MQTT to use (0: No reception confirmation, 1: Reception confirmed). |
| Keep connect | Do not disconnect server connection after each emission. |
| CA certificate | Select Amazon Root CA1. |
| SSL certificate | Select device certificate. |
| Secret key | Select private key file. |
| Use a proxy | Set to ON to communicate with the AWS IoT Core via a proxy server. |
| Proxy server | Select a proxy server. Note: You must configure the server to be used in advance on the Proxy Settings screen. |
| Topic | Topics to be assigned when publishing |
| Time out (ms) | Timeout duration for the emission process in milliseconds. Note: This item cannot be edited. |
| Message sent count | Maximum number of emissions in a single event. Note: This item cannot be edited. |
| Retry mode | The behavior when retrying after an emission failure. |
| Retry interval (ms) | The interval between emission retries. |
| Retry count | The number of emission retries. |
| After the start, data is output continuing from where the previous emission left off. | emit data continued from last time on restart. |
4.6.3.3 Test connection#
A test connection to the configured destination can be performed by following the steps below.
-
Opens the configuration window for the registered Cloud Emitter for AWS.
-
Press Test.
-
A test connection is performed to the configured destination, and the result is displayed at the bottom of the configuration screen.
4.6.4 Cloud Emitter for Azure#
This is a component that emits data to Azure IoT Hub.
It receives data from various serializers at the IN Port and emits the data to Azure IoT Hub.
4.6.4.1 Basic Information#
The basic information for the Cloud Emitter for Azure is as follows.
| Item | Description |
|---|---|
| Base name | Cloud Emitter for Azure |
| Description | This emits data to Azure IoT Hub. |
| Consumption point | 2 |
| Port | Input: 1 This receives data in file format from the serializer component. The received data is emitted to Azure IoT Hub. Output: 0 System: 1 This outputs component operation status and error information. For details about the error information to be output, refer to Error Code List. |
| Other | Test connection to Azure IoT Hub can be performed. For detail, see Test Connection. |
4.6.4.2 Configuration item#
The configuration information for the Cloud Emitter for Azure is as follows.
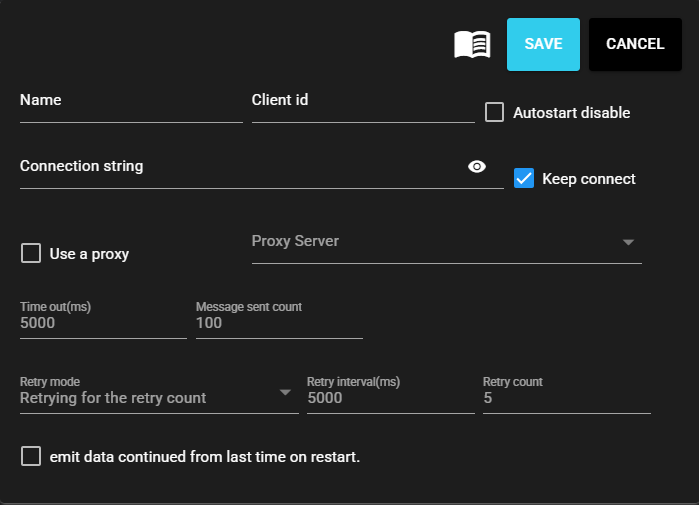
| Item | Description |
|---|---|
| Name | Name to be assigned to the component Note: The same name as another component name cannot be used. |
| Client ID | Azure Client ID (Client ID used at MQTT) |
| Autostart disable | Select ON to disable the Autostart of the component. |
| Connection string | Input Azure IoT Hub connection string. |
| Keep connect | Do not disconnect server connection after each emission. |
| Use a proxy | Set to ON to communicate with the Azure IoT Hub via a proxy server. |
| Proxy server | Select a proxy server. Note: You must configure the server to be used in advance on the Proxy Settings screen. |
| Time out (ms) | Timeout duration for the emission process in milliseconds. Note: This item cannot be edited. |
| Message sent count | Maximum number of emissions in a single event. Note: This item cannot be edited. |
| Retry mode | The behavior when retrying after an emission failure. Note: This item cannot be edited. |
| Retry interval (ms) | The interval between emission retries. Note: This item cannot be edited. |
| Retry count | The number of emission retries. Note: This item cannot be edited. |
| After the start, data is output continuing from where the previous emission left off. | emit data continued from last time on restart. |
4.6.4.3 Test connection#
A test connection to the configured destination can be performed by following the steps below.
-
Open the configuration window for the registered Cloud Emitter for Azure.
-
Press Test.
-
A test connection is performed to the configured destination, and the result is displayed at the bottom of the configuration screen.

4.6.5 FTP/FTPS/SFTP Emitter#
This is a component that transfers data using FTP, FTPS, or SFTP.
At the IN Port, data is received from serializers, and the data is transferred using FTP, FTPS, or SFTP as a file in the format of the serializer that provided the data.
This component is not compatible with communication via a Proxy Server.

4.6.5.1 Basic Information#
The basic information about FTP/FTPS/SFTP Emitters is as follows.
| Item | Description |
|---|---|
| Base name | FTP/FTPS/SFTP Emitter |
| Description | This transfers data via FTP or SFTP. |
| Consumption point | 2 |
| Port | Input: 1 This receives data in file format from the serializer component. The received data is transferred by FTP or SFTP. Output: 0 System: 1 This outputs component operation status and error information. For details about the error information to be output, refer to Error Code List. |
| Other | Test connection to FTP or SFTP server can be performed. For detail, see Test Connection. |
4.6.5.2 Configuration item#
The configuration information about FTP/FTPS/SFTP Emitters is as follows.
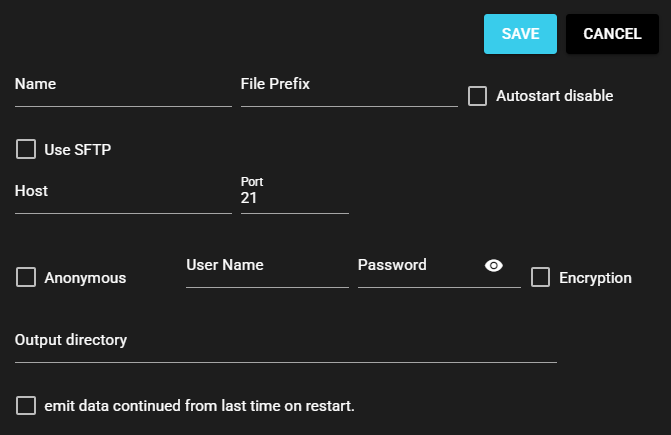
| Item | Description |
|---|---|
| Name | Name to be assigned to the component Note: The same name as another component name cannot be used. |
| File Prefix | Prefix assigned to the file name |
| Autostart disable | Select ON to disable the Autostart of the component. |
| Use SFTP. | Select ON to use SFTP. |
| Host | Specify the host name or IP address of the destination server. |
| Port | Specify the port number of the destination server. |
| Anonymous | Select ON when user authentication is not performed. Note: This option is available only when Use SFTP is set to OFF. |
| Username | Input the authentication user name. Note: This can be input in the following cases. ・ Use SFTP is set to OFF, and anonymous access is set to OFF. ・ Use SFTP is set to ON. |
| Password | Input the authentication password. Note: This can be input in the following cases. ・ Use SFTP is set to OFF, and anonymous access is set to OFF. ・ Use SFTP is set to ON, and public key authentication is set to OFF. |
| Passphrase | Input passphrase. Note: This can be input only when Use SFTP is set to ON and public key authentication set to is ON. |
| Public key | Select ON to perform public key authentication. Note: This option is available only when Use SFTP is set to ON. |
| Secret key | Upload secret key. Note: This can be uploaded only when Use SFTP is set to ON and public key authentication set to is ON. |
| Encryption | Select ON when encrypting emitting/receiving data. Note: This option is available only when Use SFTP is set to OFF. |
| Output directory | Specify the output directory in the destination server. |
| After the start, data is output continuing from where the previous emission left off. | emit data continued from last time on restart. |
4.6.5.3 Test connection#
A test connection to the configured destination can be performed by following the steps below.
-
This Open the configuration window for the registered FTP/FTPS/SFTP Emitter.
-
Press Test.
-
A test connection is performed to the configured destination, and the result is displayed at the bottom of the configuration screen.